Not everyone has the skills to design their own models for 3D printing. But modifying and mixing files is fairly easy and only requires a computer with a free editing program such as 3D Builder.
3D Builder can perform simple edits to STL, OBJ and 3MF files. You can use it to add a name to a trophy, remove a base from a figure, or drill holes into a print for hanging. It can also cut files apart and merge them, creating “mashups.”
Mashups are visual puns – combining two unrelated objects into something terribly funny. Or just terrible, depending on your sense of humor. You may have noticed that Thingiverse and Thangs, two popular free download sites, have been overrun with strange prints of Dwayne Johnson’s handsome mug plastered on everything from dinosaurs to stalks of broccoli.
Makers have been altering prints since the beginning of Thingiverse, but this latest craze is firmly TikTok’s fault. 3D printing TikTokers have gained views, followers and viral fame by posting Rock Mashups. That is, putting Dwayne “the Rock” Johnson’s face on everything. And I mean everything.
Why wait for creators to post their mashups online when you can easily make your own? Mashups can be made with any 3D modeling software – even Tinkercad – using these basic methods. For this tutorial, we’ll use 3D Builder.
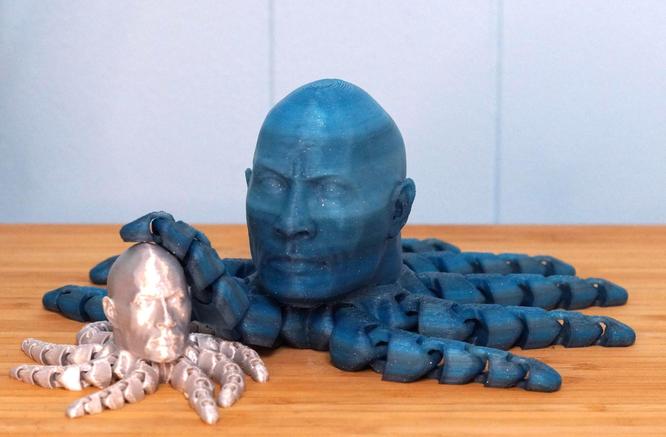
Search for files to mix. Thingiverse.com is the oldest file sharing site and has a surprising amount of common objects to print. We’re going to use a sculpt of Dr. Smolder Bravestone (portrayed by Dwayne Johnson) and the classic Cute Mini Octopus.
Dwayne Johnson:https://www.thingiverse.com/thing:4960850
Flexi Octopus:https://www.thingiverse.com/thing:3495390
NOTE the Creative Commons Attribution to see if you have permission from the artist to use their files. Don’t sell your mashup if it’s not allowed. Look for the “share alike” symbol, which means the artist is ok with remixes. The Dr. Smolder STL is free to remix and share, but you can not sell this file or anything made with it.
3D Builder is a free app from Microsoft that comes preinstalled on Windows 10 and 11. If you don’t have it, it’s easy todownloadthrough the Microsoft Store.
1. Open your first file by clicking the three lines in the upper left corner to and clicking “load object” to open your first file. You can also drag and drop STL files directly into 3D Builder. Let’s open the octopus first.
2. Click “import model” in the upper left corner.
3. Click Edit from the top menu bar.
4. Click the octopus to select it.

5. Select “split” in the upper left corner.
A green plane appears to show where you can split the model.
6. Move the plane up and down by grabbing the green plane directly with the cursor. You can also rotate the plane on the X, Y and Z axis by using the blue arrows.
7. Move the plane under the head of the octopus.
8. Click Keep Bottom from the menu bar.
9. Click Split.
This leaves a rather large hole in the model.
10. Fill the hole with a sphere so the Rock’s head has a good place to sit. Click “Insert” from the top menu.
11. Now click Sphere from the secondary menu.
12. Left click the sphere with your cursor and drag it to the octopus.
13. Right click with the mouse to reposition the models on the screen and use the scroll wheel to zoom in and out.
14. Switch from moving items to scaling by clicking the box with four arrows in the bottom menu.
15. Adjust the size of the sphere by moving the blue and green arrows.
16. Switch back to “move” and position the sphere to cover the hole. (I added color for clarity.)
Now we’ll do the same thing with Mr. Johnson.
1. Click Insert to add a second model.
2. Click the + symbol.
3. Load Mr. Johnson and click “import model” from the top left menu.
4. Click Edit from the top menu and Split from the secondary menu.
5. Move the green plane to under his chin. Angle it with the rotate arrow to cut the model above the shirt.
6. Make sure “Keep top” is selected and click “split.”
7. Move Mr. Johnson’s head over the center of the octopus. There is no align command in 3D Builder, but a handy cheat is to move each model to the 0,0 X and Y coordinates using the bottom center menu.
8. Select only Mr. Johnson’s head and scale it up until it fits the octopus body. Getting the head the right size and in the right spot will take some tweaking, but it’s worth it. Think about overhangs too: if you tilt his chin upwards a little you can avoid the need for supports.
9. When you are happy with the placement, select everything and click “group” on the right side menu.
10. Save the model as an STL file using the disk icon in the upper right corner.
Bring your model into your slicer of choice and print.