Resin-based 3D printers have been around for a few years now and are available in all sizes ranging from units small enough to fit on your desktop to larger printers that have a volume that exceeds some popular FDM printers. As printer manufacturers develop these printers, they are rapidly adding new features to make them easier to use and more accessible to the average person. Elegoo has produced several different sizes ranging from the recent Elegoo Mars 3 to the Elegoo Saturn.
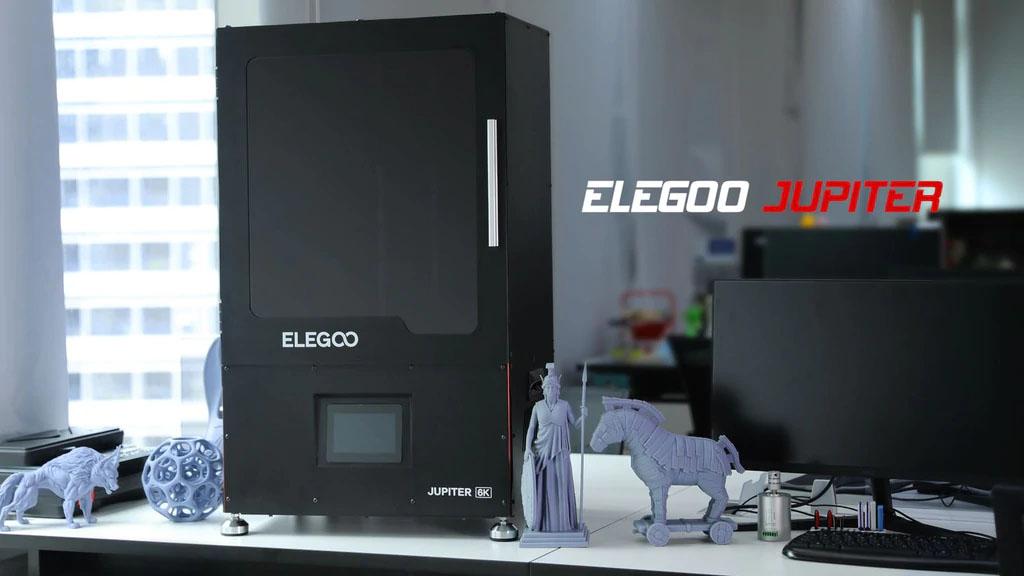
The Elegoo Jupiter is their new large resin printer and towers over both the Mars and Saturn line of printers they offer. This printer was designed to be one of the Best Resin 3D Printers in its class. The Elegoo Jupiter is currently available for preorder through Elegoo’s website for a preorder price of $1300 and should be available a little later this year. Printers with similar build volumes, such as the Peopoly Phenom with similar X and Y dimensions, but with an extra 100mm of height, normally go for closer to $2000.
With some lower budget printers you can expect to get a much smaller build volume. For instance, the Elegoo Saturn, which is closer to the $500 price point, has a build volume of less than 40 percent of the Jupiter and even the Elegoo Mars 3 at $350 has half of the build volume saturn.
| Machine Footprint | 19.61” x 14.09” x 29.53” (498mm x 358mm x 750mm) |
| Build Volume | 10.94” x 6.15” x 11.8” (277.848mm x 156.264mm x 300mm) |
| Resin | DLP Photopolymer Resin |
| UV Light | 405nm UV LED |
| Masking LCD Resolution | 5448 x 3064 px |
| Masking LCD Size | 12.8-inch |
| Interface | 5-inch Capacitive LCD Touchscreen |
| XY Axis Resolution | 51 microns |
I received an engineering sample from Elegoo and because this is a pre-production unit, the final product may be a little different. It was well packed with plenty of foam and arrived inside a crate. The printer is heavy, even once it is removed from all of its packaging, and having the help of at least another person is recommended. Inside of the crate is a cardboard box with plenty of protective foam. After unpacking, setting up the Elegoo Jupiter was fairly straightforward.
No manual was included with the printer, with the exception of a card with leveling instructions, and this was likely because a manual hadn’t yet been created yet.
All of the accessories were packed in the printer’s main compartment inside of a foam block. I removed everything and installed the build plate and resin tank into their appropriate places. I installed the included air filter into the USB slot behind the resin tank and connected power.
Included amongst the accessories were a few personal protective items including a couple of masks and a couple pairs of latex gloves. If you have any latex sensitivities, try nitrile gloves instead. You may want a better mask, because the air filtration on the included one didn’t block all the fumes for me.
There are also tools that are used in the initial setup and maintenance of the printer as well as tools used when printing and during cleanup. There are two extra sheets of FEP 2.0 film that will likely need to be replaced at some point.
For the items used in cleaning up, included are some paper strainer funnels and a plastic spatula that is used to wipe the bottom of the resin.
Finally, there’s also five auto-feeder caps, the power supply, a USB memory stick, a card with a code for a one-year subscription of Chitubox Pro, and the air purifier.
Unlike its predecessors, the Elegoo Jupiter is built with all-metal construction that makes it now the sturdiest and most durable 3D printers to come from Elegoo. On the front of the printer is a magnetically latching door with a UV-tinted window so you can monitor the progress of your prints without accidentally exposing them to any external UV radiation. The printer is similar in size to a small 2-drawer filing cabinet. The printer features an impressive build volume and is over two and a half times the size of the Elegoo Saturn.
The Elegoo Jupiter has a large tank that can hold around 2 liters of resin and also features an automatic resin feeding system that will continually add resin from a bottle mounted inside using some special feeder caps that come with the printer using gravity. The feeder caps have a nozzle that will only start allowing the resin to flow once it is locked in place. While testing, I did find that the thicker resins didn’t seem to flow, but thinner resins worked just fine.
For Z-Axis movement, the Elegoo Jupiter is equipped with a pair of linear rails like the Saturn, but it now has 2 pillow blocks per rail. Additionally, a ball screw is now used to move the build plate up and down for ultra smooth operation. A ball screw is filled with many little ball bearings to remove any backlash which provides superior movement compared to the lead screw on the previous models.
In order to help mitigate odors, the Elegoo Jupiter included an air purification module that is powered by a USB port inside of the printer for optimal placement.
The Elegoo Jupiter has built-in LED lighting so that you not only see your model as it is being produced, but also what you are doing when making any adjustments.
The user interface of the Elegoo Jupiter is intuitive and consists of large buttons and a touch screen interface that makes it very easy to navigate around.
The resin tray has screws in each of the corners that act as feet when the tray is placed on a flat surface and when it is inserted in the machine, the feet act as alignment pins to help you place the tray inside so that it won’t move.

Leveling the build plate was easy, but perhaps a little more involved than Elegoo’s other printers. Fortunately, there’s a Jupiter leveling instruction card included with the printer. First I removed the resin tank by loosening and removing the thumbscrews on each side and lifting it out.
I then removed the protective film from the resin tank and loosened all four of the screws as well as the handle in the center while the build plate was still in place. With the build plate raised, I inserted the leveling card which conveniently also acts as a perfectly sized spacer and pressed the level button.
After the build plate was lowered, I tightened up the four screws in the corners in an X-pattern using a wrench. The card lists a very specific order of the screws and you may want to take a photo of that diagram with your phone ahead of time so you have something to reference while the build plate is down.
Finally, I tightened the handle and raised the build plate. I did end up later adjusting the zero-position for the Z-Axis, but this was extremely easy. You just set the printer when you want it to be zeroed and press the Z=0 button to save it.
With resin printing, you will want to print in a well ventilated area that’s still out of the way of any UV radiation such as direct or indirect sunlight. Even with the low odor resins, the fumes can still be toxic. You will also want to make sure you are wearing gloves to avoid directly contacting the resin with your skin.
One thing that you hear discussed a bit less often is exposure to UV light. With the Elegoo Jupiter, I tested whether opening the door would turn off the UV light source and was a little surprised to find out that it continues to emit UV light. You never want to look directly at a UV light source with your eyes if you can help it and it is a good idea to avoid direct exposure to your skin as well. Most of the time, the resin will be covering up the UV light source, so this isn’t really an issue, but it is something to be aware of.
The Elegoo Jupiter did not come with any test prints and this is likely because this was a pre-production unit. This is probably a good thing because in the past, the test models that come with the Elegoo printers tend to have a large flat surface directly against the build plate, which makes them incredibly difficult to remove. When using the included removal tool in such a situation, you are likely to damage the prints and possibly the surface of the build plate.
The USB stick that came with the printer was completely blank and didn’t even include a manual, so I ended up slicing my own models and will cover how to do that down below.
The Elegoo Jupiter comes with a one year subscription of Chitubox Pro, which is a $169 value, and gives you access to many more slicing features than the basic edition. However, for the purposes of this review, I will only be covering basic slicing features to show you how to get up and running.
The first thing you’ll want to do once you’ve installed Chitubox Pro is create a new printer. Since this is a pre-production printer, there wasn’t actually an existing Elegoo Jupiter printer profile, but Elegoo provided me with screenshots of all of the settings to change on the default printer. By the time the printer is put into production, this will likely have changed. After you have your printer all set up, you can load a model in.
Slicing with a resin printer is quite a bit different from slicing for a traditional FDM printer. Since the model is printed upside down and are printed used liquid resin, there are additional things you need to take into account such as drainage holes, the weight of the item you are printing so it doesn’t fall off the build plate, and even where the supports attach so that when they are removed, you don’t remove delicate details.
For the first model, I went with the Tower of Pi to show basic slicing. This one is fairly straightforward since it doesn’t have any large solid sections, but it also has a lot of detail making it a great demonstration of a resin printer.
To get your model prepared, you will want to start by opening a file. If your model is damaged, it will detect the damage and ask you if you would like to automatically repair it. If you do come across this, just go ahead and click Yes.
After the model is finished being repaired, if you click on another tab, you will be prompted about whether you want to keep the original or repaired model on the build plate. You will want to choose “Repaired Only” or you will end up with two overlapping models.
On the Prepare tab, there is an Auto Orientation feature that will place your model at a tilt, which is ideal for resin printers. However in the case of this model, you will want the bottom of the model towards the build plate so that the generated supports are not going inside of the model, which can make them difficult to remove. Using the rotate tab on the left side, you can manually rotate the object so that it is facing 180 degrees from the build plate along either the X or Y axis.
Under the Support tab, you can have Chitubox automatically generate supports. For this model, I found the default settings to be sufficient and added supports only for items above the build platform by clicking on the +Platform button. After pressing the button, it will take a minute or so for the supports to be generated.
Once the build supports are in place, you can go back to the Prepare tab and click on the Single Parameter Slice button. This will slice the model and allow you to save the sliced file onto the USB stick that came with the printer. Once it is saved, you can eject the memory stick from your computer and plug it into the printer. On the printer, just go to the Print option from the menu and choose the model. It should show up just as it looked in Chitubox.
To print a bust, I decided to go with a model of a Yoda Bust because of the detailed textures that I wanted to see how well this printer would be able to produce. This bust took me many tries to finally get printed and that was because of the learning curve of slicing for a resin printer. One of the things I learned while printing this is that you don’t want to make a solid head because the weight of the head is too much for the supports regardless of their thickness.
To get around this, Chitubox has a nice feature that allows you to hollow out the model. It also has a feature to allow you to add drain holes so that you can rinse out any excess resin from inside the head. To start with, I loaded my model into Chitubox Pro just as described above and got it sitting at an angled orientation.
Since this is a large format resin printer, I of course increased the scale of the model to 200% in each axis. For this model, I decided to add some drainage holes and I didn’t want those to be visible on the model, so I oriented it so that the bottom of the bust was facing away from the build platform.
I clicked on the Hollow button, which allows you to set the thickness of the outer shell. I went with the default settings, but after printing it, I now wish I had increased it a little more so that the model was a bit less fragile when removing supports. I then added a few drainage holes using the Dig Hole tool on various places at the bottom. At the very minimum, you will want to add some drainage holes at the point furthest away from the build plate so any resin trapped inside will be able to drain. They will also assist you when washing and cleaning your model.
Once you have finished printing, you can wash the inside of the model out using the drain holes. In the case of the model I printed, as I mentioned, the sides were a bit on the thin side, so the eyes came out much darker than the rest of the model.
For the detailed model, I went with a model of Notre Dame de Paris Cathedral. This allowed for testing out a superb amount of detail. This was printed at 100% scale, though the printer would have handled it at an even larger scale without a problem. This particular model is already hollow inside, so using the hollowing feature was unnecessary and neither was adding any drainage holes. The main thing to watch out for on a detailed model like this is that the supports are in a place that removing them doesn’t cause you to accidentally damage the print.
I printed the model at a 100% scale and, while the Jupiter did an excellent job with many of the detailed parts, it had some trouble with the skinny spires, which ended up being a little wispy. Overall though, I’m happy with the level of detail and printing the model at a larger scale most certainly would have resulted in better spires.
The thing I found most challenging with this print was the support removal, as the supports wanted to cling to every little detail with most of them being very fragile. As such, the side with the towers ended up looking less than stellar and, if I had to slice it again, I would have oriented the model so most of the supports only attached to the underside.
For the Elegoo Jupiter review, Elegoo was kind enough to send me its largest Wash and Cure station, the Mercury X bundle. Due to the capacity of the washing and curing station, this limited the size of models that I was able to print to a degree, but they were still sufficient for most items that could be produced on this printer.
After printing, the model still has some of the leftover resin on it and, to get a resin print to look it’s best, you will want to clean it.
What worked well for me was to start off by washing the item in the alcohol first, then removing the supports while they were still soft. After that, I rinsed it under water to remove any remaining alcohol and resin residue. After letting the item completely dry, I then finally cured it and this prevented any white residue from forming on the prints.
Prints can and eventually do fail even on resin printers. Whether it happens due to support structures that are unable to support the mass or any number of other things, you still will have a mess to clean up before you can print again.
It is best to start by emptying the resin tray. This will hopefully avoid little bits and pieces from falling inside as you remove the model above it. I found that using the metal spatula on the build plate worked quite well and I used the plastic spatula inside of the resin tray to remove any pieces stuck to the FEP film. Emptying the resin first allows you to inspect the FEP film as well. If it gets too damaged, you may need to replace it before continuing.
You will also want to verify that any resin did not get on the outside of the resin tray so that it doesn’t end up getting onto the LCD screen when placed back inside of the printer, which could end up curing there. You can use some isopropyl alcohol to clean any surfaces that resin gets onto and paper towels to wipe it dry. You may want to leave any failed prints outside to dry in the sun and harden or you could pace them in the cure chamber if you like.
If you are looking for a sturdy large format resin printer that is priced much more reasonably than many of its competitors with similar build volumes, such as the Peopoly Phenom which goes for around $2000, then this is the printer for you. The Elegoo Jupiter’s print resolution is very similar to both the Elegoo Mars 2 Pro and the Elegoo Saturn, so if you’re happy with the level of detail that those printers produce, then you’ll be happy with the resolution of the Jupiter.
If you are looking for a printer with a higher resolution, you may want to consider looking at the Phozen Sonic Mini 8K which retails for less than half of the price of this printer, but at a reduced build volume.